Wednesday 4 July 2012

Centering work on the Lathe.


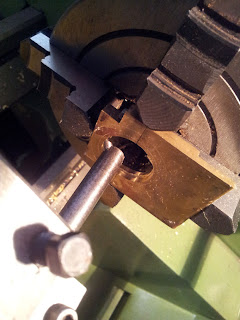
Odd shaped or square work is often set on the lathe for boring or facing etc. and is often difficult to centre.  There are several ways of doing this depending on the work itself.  If you have a centre punch mark, say where a hole is to be drilled, then you can use a dial or 'finger' indicator in conjunction with  a centering rod.  The centering rod (my term) is made with a length of accurate, ground round bar.  I use a shaft from an old defunct printer.  One end is accurately centre drilled and the other end given a point, I use 60 degrees included.  The work to be centred is mounted on the faceplate or in the 4 jaw independent chuck, depending on the work, and the centre punch mark to be centred is set approximately on centre using a good dead centre in the tailstock.

Centering Work On the Lathe
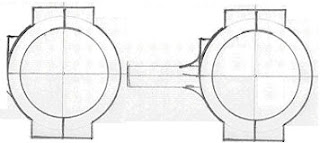
The tailstock is withdrawn and the 'centering rod' is mounted between the dead centre and the centre punch mark on the work.  if the work is rotated by hand the rod will probable show a wobble, if not you are lucky and the work is centred.  I have no photograph at the moment so a rough sketch will have to suffice to show the idea.

You can now use an indicator of some type to measure the offset of the centre and adjust until the centering rod runs true.  You will then have an accurately set job in the lathe.

I have seen various contraptions used including spring loaded devices, but I have never needed such complications but can see the logic so I may get around to designing and making one some day.  Often another dead centre with rear centre drilled hole (of course), is substituted for the rod.  Takes your choice it's up to each individual to use what is convenient.

Just a point, if you are using a 4 jaw independent chuck, set one opposite pair of jaws accurately first, then concentrate on the other two.  Trying to set all four at the same time will have you running to the psychiatric ward before long and you will take up some other easier hobby such as building a fusion reactor or harnessing dark energy.

Rear Parting Toolpost on Small Lathes.


Large diameter, large vertical force v, small horizontal force h

There has been a lot of debate about the pros and cons of using a rear mounted tool post for parting off on small(ish) lathes. Some advocate the rear mounted while some argue that they are not necessary. This post tries to look at the advantages of the rear mounted tool post in a (hopefully) simple and clear way.

Small diameter still large vertical force v1 but much larger horizontal force h1


Every lathe has some play in the headstock bearings, no matter how little, it is there, and there will be some flexibility in the tool (absolute rigidity is impossible) as well as some flexibility in the workpiece, metal unfortunately is flexible. it may be minute movement but the effects of all these are cumulative.


As I see it, the front mounted tool will tend to be forced downwards while the work is trying to climb the tool. Even if the tool is set exactly on centre before parting these effects will tend to force the tool below centre as the work progresses. There will then be a forward component to the forces h and h1 above) acting on the tool pulling it into the work and the backlash present in the cross slide screw will allow the tool to tend to be pulled forward, into the workpiece.

As the diameter of the workpiece decreases the forward pull (h and h above) increases as does the tendency of the work to climb and the tool to be forced down. Eventually the tool tries to submarine below the work into a restricted space between the work and the cross slide. It jams, causes problems and then the 'bang' we have all dreaded, a broken tool and possibly damaged workpiece as a consequence.. That is why large diameter work such a 100mm dia tubing etc is relatively easy to part off, because these effects are minimised at the larger diameter, it is as the cut progresses and the work gets smaller that the effect increases. I.e. the smaller the diameter the greater tendency to climb and the forward, pulling force acting on the tool increases and the tool submarines.


With a rear toolpost as the flexibility allows the tool to be forced upwards it is pushed away from the work due to the position of the centre of rotation of the toolpost. hence less jamming. It is also mounted directly onto the cross slide and not on the compound and the latter allows more movement due to the two sets of dovetails.

Rear Parting Toolpost on Small Lathes.


There has been a lot of debate about the pros and cons of using a rear mounted tool post for parting off on small(ish) lathes. Some advocate the rear mounted while some argue that they are not necessary. This post tries to look at the advantages of the rear mounted tool post in a simple and clear way.

The issue of parting off with Myfords (and other small lathes) is well covered on the Myfords website here. Their theory coincides with my own except the position of the rotation centre of the front mounted toolpost but that's another story. I also have an extension of the idea due to the forces involved and a little analysis will make clear my ideas. I hope. I apologise for the length of the post and hope that it is not too boring.

Every lathe has some play in the headstock bearings, no matter how little, it is there, and there will be some flexibility in the tool (absolute rigidity is impossible) as well as some flexibility in the workpiece, metal unfortunately is flexible. it may be minute movement but the effects of all these are cumulative.


As I see it, the front mounted tool will tend to be forced downwards while the work is trying to climb the tool. Even if the tool is set exactly on centre before parting these effects will tend to force the tool below centre as the work progresses. There will then be a forward component to the forces acting on the tool pulling it into the work and the backlash present will allow the tool to tend to move forward, into the workpiece.


As the diameter of the workpiece decreases the forward pull increases as does the tendency of the work to climb and the tool to be forced down. Eventually the tool tries to submarine below the work into a restricted space between the work and the cross slide. It jams, causes problems and then the 'bang' we have all dreaded, a broken tool and possibly damaged workpiece as a consequence.. That is why large diameter work such a 100mm dia tubing etc is relatively easy to part off, because these effects are minimised at the larger diameter, it is as the cut progresses and the work gets smaller that the effect increases. I.e. the smaller the diameter the greater tendency to climb and the forward, pulling force acting on the tool increases and the tool submarines.

With a rear toolpost as the flexibility allows the tool to be forced upwards it is pushed away from the work due to the position of the centre of rotation of the toolpost. hence less jamming. It is also mounted directly onto the cross slide and not on the compound and the latter allows more movement due to the two sets of dovetails.

If you have difficulty visualising, imagine a 100mm cube of wood as a toolpost, knock in a nail towards the top of one side so that 20 mm are protruding to represent the tool, and then press down on the end of the nail and imagine the movement, this is the action of the front toolpost, now lift the nail at the end and this is the action of the rear toolpost. Both are greatly magnified of course, but it doesn't take much imagination to understand the consequences of these movements.

Eccentric Sheave

View of Machined Sheave Showing Locating Rib
The next part to be made was the eccentric sheave.  This was a relatively straightforward turning job but there was some query about the eccentric centre in relation to the centre of the sheave.  I have been referencing the valuable little book by Andrew Smith in which he describes the manufacturing process.  When drilling the sheave for the eccentric, he says to set the centre at 11/64" (4.37mm), however the drawing shows the distance as 9/64" (3.57mm). making a difference of 1.6mm on the throw of the eccentric.  Obviously that would make quite a difference in the valve movement on such a small model.  An enquiry on the Model Engineer magazine forum returned the answer in a very short time.  It turns out that the drawing is correct at 9/64" which goes to show that it is important to double check even the best of source material.  It is well known that there are often mistakes in published drawings and text so it is o=important to check and double check.  The internet interest forums are such a valuable resource these days, no longer are we working alone and in the dark, there is always knowledgeable person willing to offer suggestions and information.


The most tricky part of the sheave was the rib which had to be machined accurately to match the groove in the strap.  Initially it was a plain cylindrical machining job. A piece of FCMS (free cutting mild) steel  with a generous chucking allowance was turned to the overall diameter of the rib.  Left hand and right hand lathe tools were then used to turn the smaller diameter to fit the main internal diameter of the strap.
The now established centre of the eccentric was marked out, centre punched.  This was set to centre  (for the method of doing this see the page - 'Centring work in the 4 Jaw') in the 4 jaw independent chuck on the lathe and the boss turned to diameter.  The drilling to 7/16" (11.1mm) was done by step drilling with a succession of drills in the drilling machine.  That was quite accurate enough, no need for reaming.  To complete the eccentric a hole was cross drilled in the eccentric boss and tapped 5BA for a fixing grub screw.  Now for a bit of finishing bling with wet 'n dry.

Making The Eccentric - Valve Connecting Rod


The connecting rod was made from some scrap sheet of the right thickness as I did not have the correct MS flat to the Stuart specification i.e. 1/4" x 3/32" (6.35 x 2.4mm).  I cut a longer piece than necessary to allow for final fitting.  To cut it I used my favourite 'file handle' grip hacksaw.  It is an ugly but ancient tool, rather like myself some would say, but I have a soft spot for it as it belonged originally to my grandfather, and he died in the late 1950s aged 72, so it has earned it's keep over the years.


Initial Cutting of Connecting Rod Blank
 As I was cutting obviously I reached the limit of the effective sawing which was restricted by the length of the hacksaw frame (I am using a coarse 18tpi 10" (250mm) blade.  I can get away with a coarse blade as I am cutting at a low angle, it is important for accurate work and to prevent blade breaking that there are always at least three teeth in contact with the work at all times.  In order to overcome the problem the blade is turned through 90º and now I can carry on cutting for as long as I like.


Blade Turned Through 90º


Here is the strip blank cut together with the HI Tech tools I used.  The cutting took me around 4 minutes in total.  The age of the Hacksaw really shows but it is capable of quite accurate work. By the way, these tools except for the stainless rule, were salvaged from the fire and refurbished,  I fitted a new (old) handle to the hacksaw.


Tools Used To Cut Blank

 
'Nose' of Toolmakers Clamp seen at Upper Left.


 Next I draw filed the flat sides of the blank as I was going to mill it to near width later.  The picture below shows the blank supported on a 12 mm square bar in my small bench vice.  The end was clamped with a traditional toolmakers clamp, a very effective tool if used correctly, unfortunately many users don't bother to set the jaws near parallel before using.  Tremendous clamping force can be applied.

I used a number of files of increasingly fine teeth finishing with emery cloth supported by a 10" flat file.  I had to be careful to keep the face flat and was reasonably successful.


Milling, Using a Ground Bar to Aid Vice


I then milled the edge roughly to size.  The blank was supported on narrow parallels but they were too thick for the vice to clamp so I used an accurate ground bar (from an old, broken printer -  what would we do without Mr HP's scrap?) to act as a spacing clamp bar.

The blank was too long for the vice so I had to mill half and then move it along for the second half to be machined.  Not precision but I was going to file the edge eventually so I wasn't too worried.

After finishing one edge I filed it straight by hand - it was only a few thou' out anyway - and polished the first edge  I then milled the second edge.


Draw Filing Blank in Small Bench V
The final job was to file the blank to 1/4" width (6.35mm or 0.250").  As before this was done with  succession of files, getting finer as I went along.  It was then finished with emery as before I went from 150 emery down the grades to 600 grade. which gave a reasonable finish to the part.

I was pleased with the final blank as it was to within half a thou' (0.0005") over it's length - see pictures below.  This sort of accuracy is not necessary on such a component, after all it could be shaped like a Chines Dragon for all that matters, but I like to get a job right if I can without too much hassle.

Once it was to size It was a simple task to transfer the holes from the strap.  I did that by glueing the parts together with Loctite and using the holes in the strap as a drill guide.  I would normally use a clamp but this component is too small.

Images showing the width of the connecting rod at both ends and the centre, which is 0.005" narrower.  I don't think that I'll worry about that!
Width at 'Top' End
Width at Middle.
Width at 'Bottom' end.
A result! 

It took around 30 minutes to get here but much of that time was taken up by getting a good finish on the blank, and drilling etc. which I would have had to have done on MS flat a real plus was that I didn't have to pay excessive postal costs and wait three or four days for it's arrival.  By recycling old material I was able to carry on the work in hand quickly, saved myself money, had the satisfying warmth of a job well done plus I did a bit for the environment.  The photographic time was extra.

Friday 29 June 2012

Valve Gear For the Stuart Beam Engine

Eccentric and Strap - Part 1 Strap

 
My Drawing of The Eccentric Strap - To Scale


The First part I decided to make for the Stuart Beam was the eccentric sheave, strap and connecting rod.  The strap was the first to be made as the eccentric sheave is made to fit.  In the original kit the strap is made from a casting, but the original was lost and Stuart Models had been sold to new owners at the time, so I decided to fabricate one from solid. Firstly I drew up the strap accurately to scale from the Stuart drawings.  I then used this as a rough cutting template by sticking it to the brass blank with the simple use of PVA white glue.  This holds very well but is eventually easy to remove.

Unfortunately I had no 1/4" thick brass stock but I have some 1/8" flat, so I silver soldered two pieces together using high silver low temperature solder.to make up the thickness.  I did this by flattening a length of round silver solder and made it into a ring around the same diameter as the strap.  The parts were fluxed, the silver solder positioned and the 'sandwich' was made.  In order to prevent the parts moving too much when soldering I arranged that the 'sandwich' was restrained on two sides by firebrick.  The parts were heated and successfully soldered.  I had tried to soft solder the parts but that was not as successful as the use of Silver Solder.  Soft soldering, if properly carried out, is much stronger than most folk realise.  It does no just act as a 'glue' sitting between two surfaces.  A perfect soft soldered joint will have the thinnest possible layer of actual solder as it should actually alloy with the parent metals it is joining at the boundaries of the joint.  It is strong in tension and shear (obviously in compression as well).  However it is weak in 'peel'. therefore those situations should be avoided.

Back to Making


The first stage was to cut the blank across where the joint is to be made. The edges of the two halves were milled accurately.  They were then drilled tapping size.  The hole in the cap were opened out to 7BA clearance while the hole in the body were tapped 7BA. The two parts were bolted together ready to bore out to size.  You should be able to see what I mean in the picture below.

 The blank was then mounted in the 4 Jaw independent chuck and the part centred where the eccentric sheave is to be located.  I drilled out as much as I could, step drilling up to my largest drill. 


The boring bar was then used to bore the strap to size.  It has a groove to locate the sheave so a HSS tool was ground up for the boring bar and the groove carefully bored. 

One point to note is that I ensured that the blank was located in the chuck accurately by using a steel block held against the front of the jaws with the tailstock, and the blank, just held gently in the jaws of the chuck was forced against the block before tightening the jaws of the chuck hence locating it accurately.

After boring the strap was finished by milling and filing to shape using normal practices.  The initial profile was rough milled and then the part was filed to profile with a succession of finer files and abrasives.  It is shown here with it's eccentric before the eccentric and boss were drilled and turned.

It is now just in need of a bit of final bling to get to a high finish.  however I do not want it to be too perfect as I prefer the model to reflect an engine in 'working condition', I'm not to keen on those Highly polished ones I see on the exhibition circuit and in magazines from time to time.
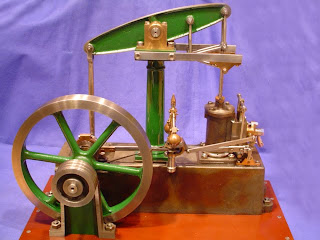
Stuart Beam engine - see text for source.
Hi, I'm back again after a long break.  I have managed to get a reasonable workshop up and running and I will post a few articles and photographs of developments in a little while.  The main picture here is not of my engine but a lovely example of the same Stuart Beam, which I 'borrowed' from IndianaRog and the Temple of Steam - here.  If he wishes me to remove it, please contact me and I will comply.

I have now started a few projects, I tend to keep two or three on the boil as it helps to keep my short attention span concentrated.  Also I lost my lifetimes collection of tools, equipment and materials in the fire which destroyed my garage/workshop.  Hence, when I realise I haven't replaced something, I often have to postpone work until I can order replacement tools and /or materials.  Also I have been making a few workshop aids and tools as I go along as need demands.

At present I am  concerned with refurbishing a Stuart Beam Engine and Boiler.  These were obtained from a friend some years ago and a second friend offered to refurbish the poorly made model.  Unfortunately that 'friend' was not very reliable and left the model in component form after stripping it down to the last nut and bolt.  I took the model back and stored it for a while but it was in the garage fire.  I managed to salvage the main parts i.e. the column and beam, the main base and flywheel plus crankshaft as well as the cylinder.  Most of the other parts were wither lost in the fire, too badly damaged to repair or simply badly made.  The boiler was badly damaged but I have put that aside while I concentrate on the main engine itself.